A dado rail is a decorative wooden moulding fixed around the perimeter of a room, usually at waist height. They are mainly used for aesthetic reasons, but can also be for the purposes of protecting the walls from furniture.
Traditionally, the height of the dado rail fixing is taken from the height of a pedestal of a classical column – approximately 24 inches, or 1/5 the height of the room – higher ceilinged rooms have higher dado rails.
In period properties, dado rails were popular from around the middle of the 19th century. They would have been most often found in sitting rooms, drawing rooms, hallways and on staircases, where there is most movement of people and furniture. If you’re restoring a Victorian home or you’re renovating a property in period style you may wish to reinstate or add a dado rail.
- Decide on the height of your rail
If you’re reinstating or replacing a previous rail, it’s best to simply install the new one in the same position as the original. If there was no rail originally, aim for a height between 3 and 4 feet up from the floor. Mark the height on the walls at each corner and along the walls using a spirit level or a laser level positioned in the centre of the room.
- Measuring on stairways and slopes
Measure and mark the correct height for the dado rail from the front of the tread for both the top and the bottom stairs, and join these marks with a straight line to find the line up or down the stairway. Extend your line to intersect with your horizontal line around the rest of the room to find where you need to make the joint and angle.
- Cut the dado rail moulding
As with the method for installing skirting boards, start with the longest length of continuous wall. If you need to join two pieces of the moulding together along a straight edge, you should use a mitre joint. When you’re joining pieces at either inner or outer corners, it is easy to become confused – if you’re forming an external mitre you will need a piece of rail which is longer than the wall itself. The measurement on the back of the finished cut piece will always be the same as the wall length, but the front will be longer if you’re using an external mitre joint at either of the ends.
- Fix the rail into place
Your fixing method will depend on the construction of your wall, however whether you are using an adhesive, nails or screws, you should not screw or nail too close to the ends of the moulding. Keep your fixings a minimum of 3 feet apart to ensure a strong hold.
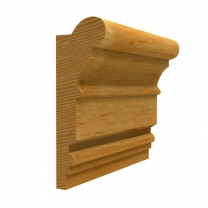
We have a selection of dado rail mouldings to suit your taste and décor, and we are also able to advise which of our styles would be most authentic in your Georgian or Victorian period property. Our bespoke service means we can exactly match your existing moulding from a small sample or a drawing, so you can maintain consistency and traditional features throughout your home.

Christine Kelley is a dedicated home blogger who has been blogging for over six years. She covers everything home related. Christine also loves writing posts about her travels to Europe with her husband and two children.

